Tuesday, 17 May 2011

Shirt...finished!

...and so I have finally reached my last garment for the National Theatre's Hire Department, and once again I found myself with a bit more of a challenge than I had been given with the waistcoat and certainly the chemise.

I originally started with a quick tutorial with Dexter to outline the basic process for making the shirt: First the front opening would need to be constructed, then the back would be gathered and applied to the yolke to then be attacked on to the front. The sleeves and cuffs would then be constructed and sewn together before sewing the godae onto the main body of the shirt and attaching the sleeves. Finally the collar would be constructed and the shirt would be overlocked and hemmed. I was advised by a fellow student to take care when attaching the yolke as the stitch lines needed to be as straight as possible and it was very easy to mess this up.

The shirt was gathered at the back......and the cuffs.The collar had a pleated detail, and the front was buttoned up with four buttons.
The added godae allowed for extra arm movement during the 18th Century.

I had not anticipated the amount of work that would need to go into this garment - if I had forseen this I would have tried to allow myself more time to make this, like giving myself two weeks rather than one. This sense of short time is what has pressured me into leaving more mistakes than I would have liked - where faults occured I did my best to rectify them, but if they persisted I left them in the best state I could as I would rather hand in a more completed shirt than have a partially completed shirt with highly bruised fabric and the signs of last minute stress on it! Again, the best way to resolve this would be to plan my time much better and refer to my time plan constantly to review whether I am on track with my work or not.
Once I had completed my shirt I unfortunatly noticed that the front piece was uneven and would bulge out once the shirt was buttoned up. To rectify this I feared I would have to pull apart the entire shirt, so I decided to leave this error.

It comes as a relief to me that after our hand in we shall recieve further feedback from our tutors to rectify any issues with the garments so that they are at an acceptable standard to hire out.
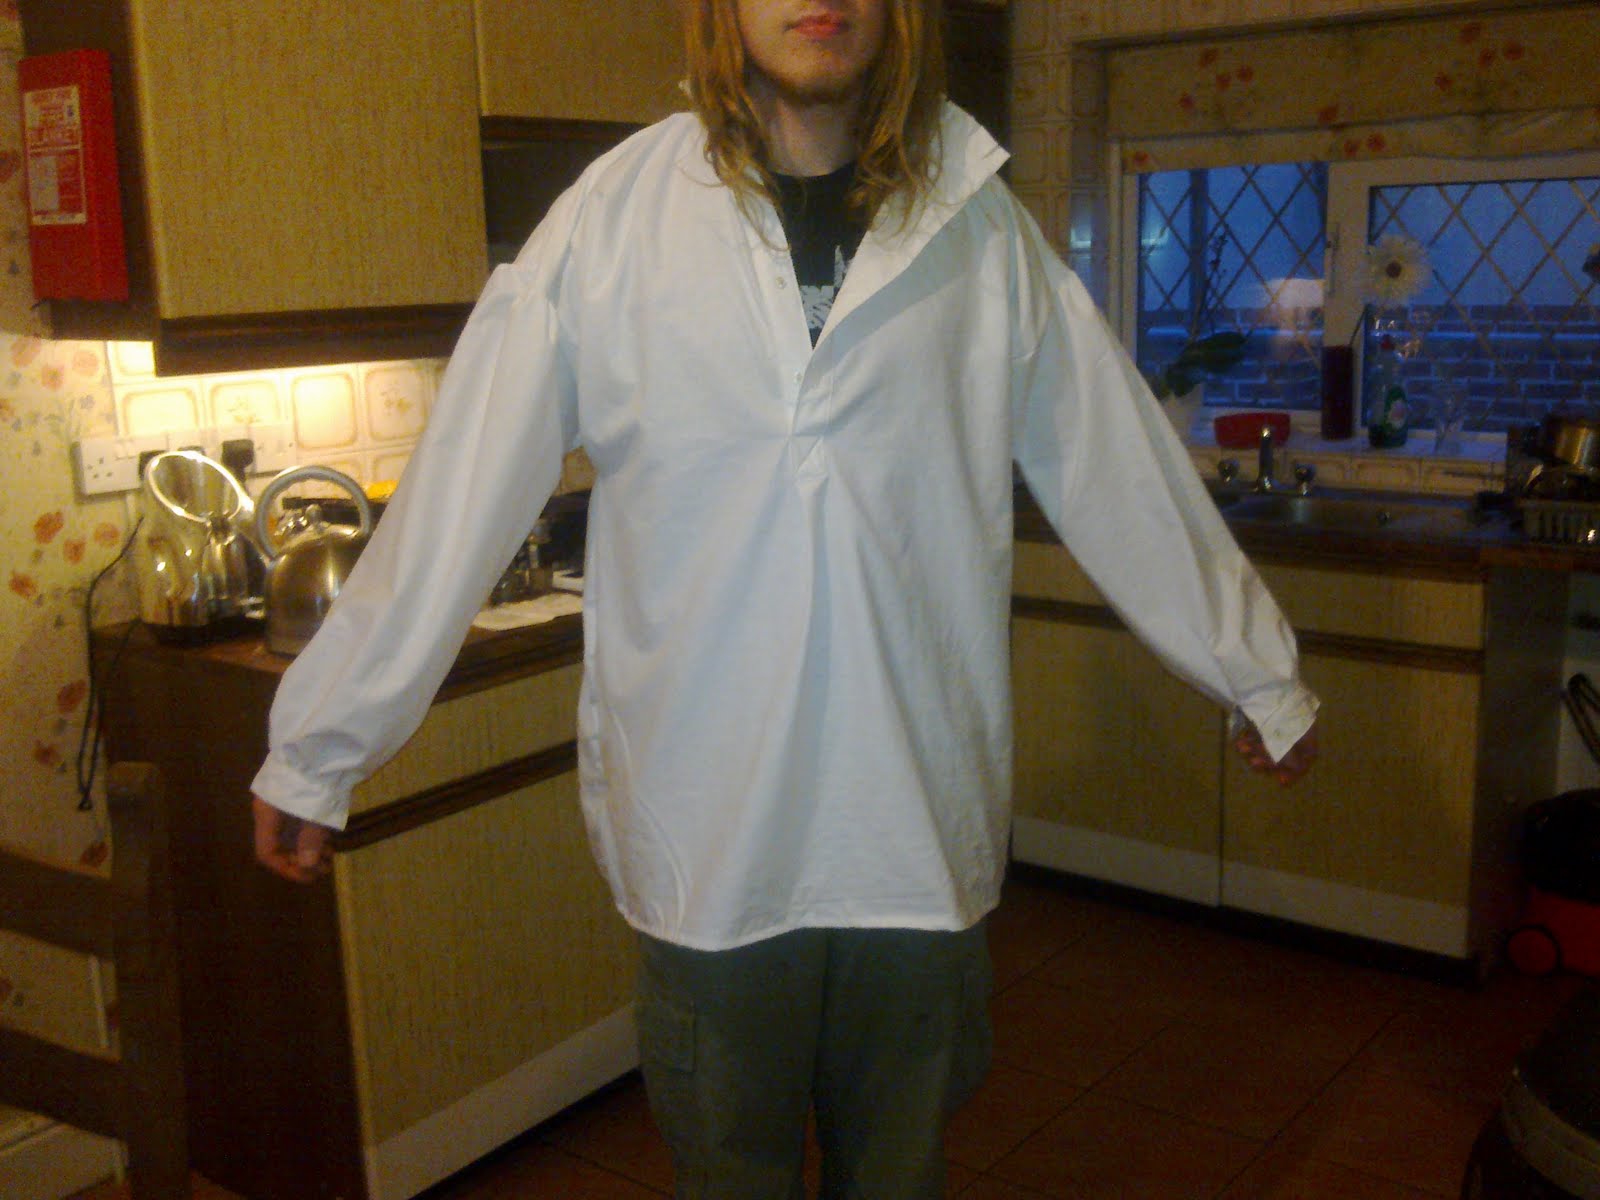
(Luckily I had my housemate's Coffee Viking on hand to borrow to model the completed shirt...I feel that Apocalyptic Metal and pillaging and the 18th Century don't fit so well together).
Overall I am pleased with the outcome of my shirt, though I look forward to seeing which areas I need to improve in order to make it a good enough quality for the National Theatre Hire Department.

Tuesday, 10 May 2011

Chemise...done!

Due to lack of time (horray for Royal Weddings, bank holidays and what-not) I was required to change my work schedual slightly - trying to squeeze as much making as possible into the last week before handing in my pieces. Luckily I was able to borrow a small domestic sewing machine for the time that I was in London on work experience which saved me some time and took off the pressure of having to make two garments in a week. Obviouslt to overcome this I need to look back over my time plan at least once a week to ensure that I am on target with my work and not in danger of running out of time.

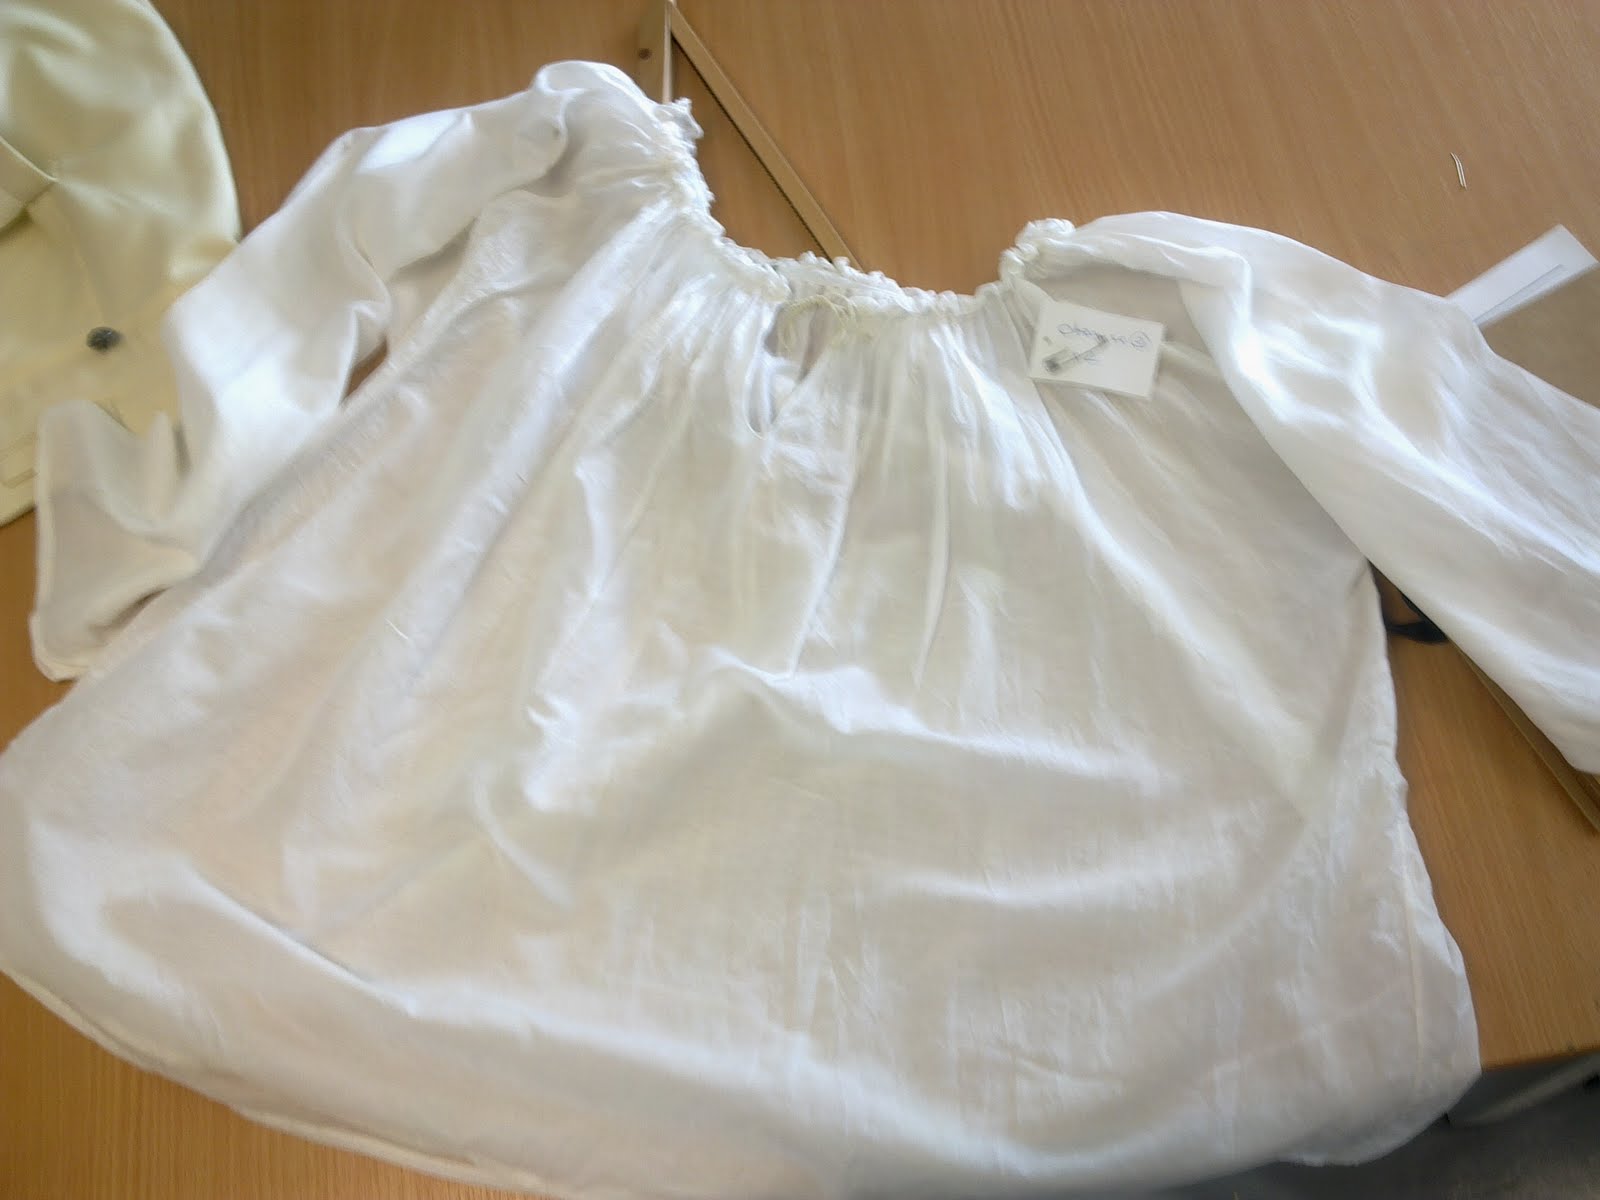
When working away from the studio I had a rough idea of what the garment should look like - pretty much all of the seams were french seams with only the godae straight stitched in and overlocked.The neckline seemed to be gathered then applied onto cotton tape with elastic. For my piece I just used elastic to create the same effect. A small zigzag stitch was used to gather the material edge to neatly finish off the raw edge of the material.

The only problems I encountered with this garment were with the material - it was so thin that it was impossible to mark with coloured chalk and using pins bruised the material too much. I overcame this by using white chalk to mark out the design lines and used as few pins as I could possibly manage. Due to the fineness of the material it had a tendancy to bunch up under the sewing machine, emphasising that it is always vital to test a scrap piece of material under the machine to test the stitch tension and to ensure that the material will be able to handle going through the machine.


The chemise took two days to make, which was surprising as I had expected it to take longer. As I did not have the sample to refer to when making the chemise it is not an exact replica of the original - the only difference is that the french seams are not as fine as the sample chemise, however these could easily be altered if necessary.

Wednesday, 4 May 2011

Shirt - Research.

The shirt has been an essential undergarment for men throughout history and has slowly developed over time whilst maintaining a couple of main aspects. The sleeves have always remained long and the shirt length no longer than hip length. Around the 18th Century gussetts were added to the shirt sleeves to allow extra movement, and the collar was shortened to touch the jaw line rather than the cheeks to allow a more free movement for the head. A high standing collar (much like my design) would usually have a cravat tied beneath it.
From The History Of Underclothes by C. Willett Cunnington, 1981.

Monday, 2 May 2011

Waistcoat...completed!

So my waistcoat took me once again about 2 weeks to complete. Thanks to my realisation that I have less time that I thought I sis I am now slightly behind schedual...time to pick up the pace!
Constructing my waistcoat felt considerably smoother than the process for making the breeches had been as I had previously make a waistcoat at the beginning of the year in tailoring whereas I had never made a pair of breeches before. I used the notes that I had written for my tailored waistcoat as a rough guide for constructing my military one, for example using it as a reminder on how to put the lining together and apply the facing. As the military design was quite different from the tailored design I sometimes struggled to transfer the instructions across.

I once again used The National Theatre's example to ensure that the quality of my work was up to their standard and that my methods were similar to their own.


After carefully examining all of the details I started work on my own piece, constantly referring back to the sample.


The only major issue that I encountered was that once I had sewn the back pieces to the front pieces and bagged them out I had realised that the drawstring tabs were on the inside of the back piece rather than the front. It was easier and quicker to unpick these and transfer them on to the back of the waistcoat rather than unpicking the entire waistcoat to flip the back pieces round. In future I will need to carefully consider how the waistcoat will turn out in this situation before anything is sewn permanently.


Overall I am extremely satisfied with my waistcoat, I feel that the quality of my making is improving since the breeches I constructed as I am getting into a habit of caring for my fabric, avoiding handeling it too much and ensuring that my stitching is as neat and secure as possible.

Sunday, 1 May 2011

Chemise - Research.

The chemise is an undergarment that is tiypically warn underneath all other garments, even under the corset, bodice or stays. The chemise was first about in the late 1400s in a style that was similar to the male shirt - with a collar, opening at the front tied with a drawstring. They later varied from having no sleeves to having long sleeves, and gussets were later added to allow more movement. The garment had no embellishments for the lower classes as it was a garment completly hidden from view, aside from the collar and sleeves if they were chosen to be shown. Only the upper classes used embroidery to represent their wealth.

From The History Of Underclothes by C. Willett Cunnington, 1981.
From The History Of Underclothes by C. Willett Cunnington, 1981

Saturday, 23 April 2011

Another late one - Breeches feedback.

Just as a reflective note: I need to keep on top of my blog and up to date!

When I submitted my breeches to my tutor Dexter he had the following points to make for the quality of my breeches improve:

- Button hole stitch underneath the arrow heads of the front fastening to stop any fraying. I completly re-did these arrow heads as they were uneven to begin with and I was able to improve this area.
- Re-sew along the bottom of the cash pocket to conceal any stitching when the pocket is used.
- Get into a habit of trimming any loose threads once you have finished sewing a line.
- To neaten the cash pocket remove my prick stitching, iron under the pocket on the main body of the breeches to reduce bruising then iron the pocket mouth, pin it in place and prick stitch again.
- To neaten the welt pocket baste down the welt, unpick the uprights, straighten them out more and re-sew them.
- For the crotch I needed to unpick the stitching and re-sew it to make sure that the seams are sewn all the way to the edges so that when they are pressed flat they will lay as flat as possible and will be comfortable to wear. Dexter also noted that the sign of a good maker was that the seams for the crotch crossed perfectly, so I aimed to do this as best as I could.
- A point that must be maintained the next time I make a pair of breeches is that the waistband and kneebands must run smoothly and evenly to show professional craftsmanship.

Sunday, 17 April 2011

Waistcoat - Research.

The waistcoat at this time has a distinct military look to it - it appears to be tight fitting and formal. It is buttoned all the way up the centre front with a pocket on either side, and is tightened round the back using lacing. The waistcoat in the 18th Century was generally mid-thigh length but eventually shortened to the waist at the beginning of the 19th Century.

Augustus John The Third Of Briston by Thomas Gainsborugh, 1968.
George Lord Vernon by Thomas Gainsborough, 1967.

Wednesday, 13 April 2011

Time is catching up!

It dawned on me this morning that it is quite unlikely that I will be able to finish all of my garments in time for my hand in. A bit of a downer really!
By Easter I had hoped to have my waistcoat and breeches completly finished and my material for my shirt and chemise cut ready for me to use after Easter. In the first week back I had planned to get as much of my shirt completed as possible, then over my week of work experience I would make my chemise in the mornings before heading off to the Queen's Theatre for 1. After my work experience that would leave me a week to tidy up any loose ends before handing in on the 16th.
I suspect that I am behind with my waistcoat due to a couple of studio days I took off for personal reasons, I would probably be more on target if I hadn't. I will no longer be able to work on my chemise over my week of work experience as the only way I can now to get to my accommodation is by train and I dare not risk taking my mum's aging sewing machine on a trip for a couple of hours!
I am awaiting a little piece of advice from my tutor before I start losing my head over this. My only worry is if I get penalised too much for not completing all of my pieces - I have alot to pick up from my last result from Candide.

Thursday, 7 April 2011

Blog Tutorial and PoP!

...and so, I was given feedback on my bloggy blog!
Ideally I am supposed to post daily and to give a weekly reflection. I need to refer to my original time plan and learning agreement, focusing on what I have been learning through my sewing skills and any improvements I have made. I need to do much more research (and yes, reflect on it!). I need to be critical of my work or lack of, recognise these issues and address them.

Another fun addition to my mountain of work was the final decision on my Perceptions of Performance essay. I'll be writing about Alice in Wonderland, and how the story has been adapted to suit a variety of audiences. My initial idea came from the idea of the transition from book to screen to stage with the likes of Phantom of the Opera, but I think my enthusiasm for my last minute idea won my tutor over! One of my points will hopefully look at how the sinisterness of the original illustrations (Tenniel) ranges in its adaptations to a more child-friendly look (Disney) back to a more modern look, but still slightly unnerving (American Mgee). I shall be diving into the world of silent movies, ballet and possibly even porn!
Down the rabbit hole I go...

Sunday, 3 April 2011

Breeches...done!

Once again this post comes slightly late, but besides any small tweaks that need to be made to them my breeches are complete! They were an interesting item to begin making as I had never made a pair of breeches before. In order to make the breeches as professional and neat as possible I used the National Theatre's example pair as a reference. The opening for the breeches consisted of a button opening and a front flap to conceal the opening. A cash pocket was on the left side of the breeches and a small welt pocket on the right. Putting the breeches together was relativly straight forward. By avoiding putting any seams together the material was kept as clean and crisp as possible. So as not to spoil my fabric I created a sample for the welt pocket before applying it to my breeches, allowing me to refresh myself on the construction of a pocket and perfect my pocket making skills. This method prooved to be successful, giving me a happy looking pocket! The uprights for the completed pocket need to be straightened and sharpened slightly, which will be completed as part of my 'to tidy' list. The cash pocket seemed to be a simpler make so I went to apply this directly on to the breeches and after a considerable amount of fiddling it was finally completed. The pocket does not lay directly flat on the breeches, another fault that will be rectified at a later date.
Hopefully the breeches should be completly finished tomorrow, allowing an evaluation complete with pretty pictures! Huzzah!

Friday, 25 March 2011

Breeches - Research

The breeches I am making are typical of the 18th Century - they are relativly close fitting with their length finishing at the knee. Alot more attention to detail was given to the breeches at this time as waistcoats and overcoats were shortened.
Please click the image below for a larger view:
1 - Arrow heads - decorative part of the front flap for the breeches. Button fastened closed. Front flap is used to hide fastenings underneath.
2 - Welt pocket on the waistband - used as a ticket pocket.
3 - Larger pocket - used as a cash pocket.
4 - Knee bands - once again arrow heads are used in this design. Button fastened closed.
5 - Inner fastening - used to keep the breeches buttoned up.
John Plampin by Thomas Gainsborough, 1952.
A Fanily Group In A Garden by Alan Evans, 1974.

Monday, 21 March 2011

A Trip To The National Theatre!

This post has been a bit long overdue.

Two weeks ago our crew of SDP makers for the National Theatre visited their hire department for a mooch around, a handful of questions and (of course) a chance to dress up! Not only was it useful to see so many costumes close up to look at construction, any broken down elements and how easily the costume gets worn in, it also gave an insight into how the hire company funtions, their layout and organisation of costumes and their policies when it comes to costume hire.

Every girl's dream...if they worked in TV or Theatre!

I liked the smaller details of the broken down costumes, right down to the subtle mud on the boots.


The armour was interesting too, especially this leather piece and how they've coloured the leather to look older.

Wonderful details on the back of a dress modeled by Emma. We had seen the same dress on a trip to the National Theatre earlier in the year (below).
Myself in a doublet from 'Women Beware Women'. Made from cow hyde, laser cut and dyed pink with hair dye, this was another costume I'd fallen in love with when we saw this before at the National Theatre.
Mandy in Belle's sack-back dress from the National Theatre's production of 'Beauty and the Beast'. We had seen The Beast's costume before at the National Theatre as well, though that time in production! (See below).
So much work seemed to go into this dress, modeled by Lucy, though it had either been loved or neglected too much as the lace and beading was quite fragile.

Tuesday, 22 February 2011

Hooray, Self Directed! Hooray, Work Experience!

Wonderful news for me - my project for Self Directed is in, and I have been given a week of work experience!
First off is the Self Directed Project. Whilst I would have loved to do my Erte-esque project my tutor pointed out that this was something more suitable for third year. It makes sense to put off that project for now, especially since I have been given the project working for the National Theatre's hire company! Allow me to copy and paste my brief from my tutor's email:

Costume Makers x up to 10 students.

The National Theatre is commissioning the costume course to create a number of costumes pieces for their hire department in North London. This is an exciting opportunity to work for a number of costume makers. Undertaking this role you will work closely in a team with other makers to realise a number of garments for the National Theatre. This project will replicate workroom practice. A cutter from the National Theatre will draft the patterns and you will work as costume maker making the garments chosen by the costume designers and head of the hire department. An example of the garment to be made include Period shirts, Breeches, Victorian Blouses and 18th military Century Waistcoats. Each person will make approximately 4 garments each but this will be negotiated with your unit tutor.

All materials and patterns will be supplied by the client.

Such exciting stuff! I really need to make a little trip to see if I can have a mooch around the hire department either before or whilst I'm working on the project.

Next up...work experience! First a little story. Another of my tutors sent an email offering work experience on a big London production, not letting on which show it would be for. Working on a big London production? Yes please! Practically leaping for the oppurtunity I said yes, though poking forward my thoughts of my confidence in my sewing though I only considered them 'average', however this experience may boost my confidence and skill a bit further. Lo and behold, hearing back a week later I will now be doing a week of work experience at Les Miserables, coincidently my favourite musical!

Ok, so I haven't seen many musicals...but still, I had to scream and jump around my room before shrieking down the phone to several people. I think I need to get out more.

Both of these projects will offer me so much and will hopefully strengthen my skills as a costume maker. I have been slowly gearing towards working as a part of a show, theatre company or costume department, so the combination of these two at least compliment my dreams for the future! Hold on tight!